Raising an invoice in Xero is simple and efficient. Xero helps you manage your finances smoothly.
Invoicing is a crucial part of any business. It ensures you get paid for your services or products. Xero Accounting Software makes this process easy. Whether you’re a small business owner or a freelancer, Xero’s user-friendly interface helps you create and send invoices in no time.
This guide will walk you through the steps of raising an invoice in Xero. You’ll learn how to set up your account, create invoices, and send them to clients. By the end, you’ll be confident in managing your invoicing needs with Xero. Let’s dive in and simplify your invoicing process.

Credit: m.youtube.com
Introduction To Xero Invoicing
Xero makes invoicing simple and fast. It helps businesses manage their finances. Small business owners find it easy to use. Xero is cloud-based so you can access it anywhere. Its interface is user-friendly. This makes it easy for non-tech-savvy people.
Benefits Of Using Xero
Xero offers many benefits. First, it saves time. Second, it reduces manual errors. Third, it provides real-time updates. Fourth, invoices are customizable. You can add your logo. You can set payment terms. Lastly, it integrates with other apps. This makes your work easier.
Key Features Of Xero Invoicing
| Feature | Description |
|---|---|
| Automated Reminders | Sends reminders for unpaid invoices. |
| Custom Templates | Allows use of personalized invoice templates. |
| Online Payments | Accepts payments online via various methods. |
| Multi-Currency | Supports invoicing in different currencies. |
| Tracking | Keeps track of inventory and expenses. |
Setting Up Your Xero Account
To begin, visit the Xero website. Click on the “Sign Up” button. Fill out your personal details. Use a strong password to protect your account. Verify your email address to activate your account. Now, you are ready to explore Xero.
Log in to your Xero account. Go to the Settings menu. Set up your business details. Add your company name and address. Choose your currency. Select your tax settings. Save your changes to complete the setup.
Navigating To The Invoicing Section
Access the invoicing section in Xero Accounting Software by clicking on the “Business” tab. Select “Invoices” to start creating your invoice.
Accessing The Dashboard
First, log in to your Xero account. You will see the Dashboard after logging in. The Dashboard shows your recent activities. It also shows your bank balance. This is your starting point.
Locating The Invoicing Tab
On the left side, find the menu. Look for the Sales tab. Click on it. A dropdown menu will appear. Click on Invoices. Now, you are in the Invoicing Section. You can create, view, and manage invoices here.
Creating A New Invoice
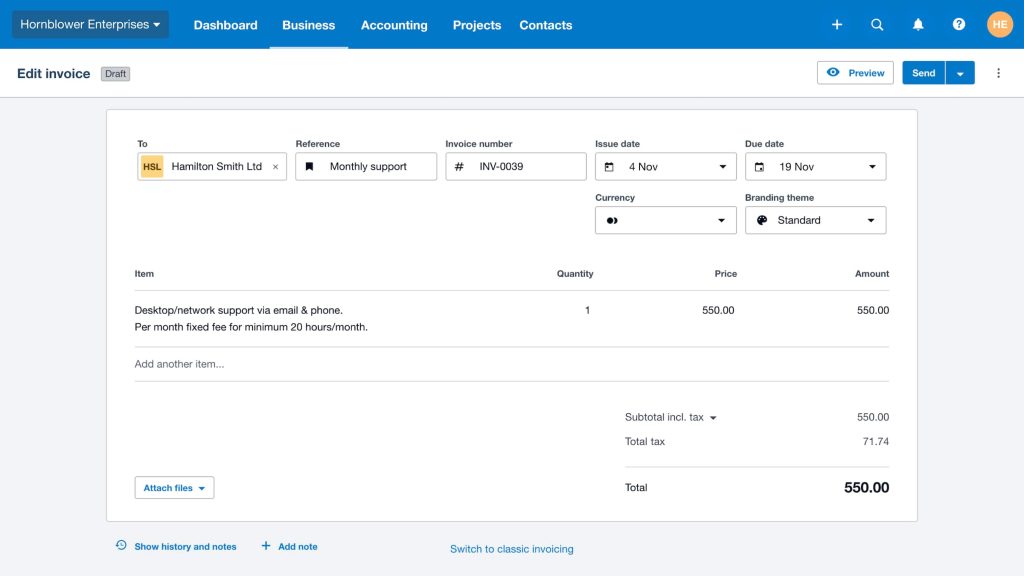
First, log in to your Xero account. Then, go to the “Sales” tab. Next, click on “New Invoice”. A form will appear. Here, you need to enter the customer details. Start by typing the customer’s name. If the name is already in the system, it will auto-complete. Make sure all details are correct. This includes the address, email, and contact number. This step is very important. It ensures the invoice goes to the right person.
After entering customer details, focus on line items. Click on “Add Item”. Enter a description of the product or service. Include quantity and price. The total amount will calculate automatically. If you have more items, repeat this step. Make sure to check everything before saving. This helps avoid mistakes. When all items are added, your invoice is almost ready.
Customizing Your Invoice
Select an invoice theme that fits your brand. Go to the “Settings” menu and click on “Invoice Settings.” Here, you can choose from different themes. Make sure the theme matches your business style. This helps in creating a professional look.
Set clear payment terms to avoid confusion. Go to “Invoice Settings” and find the “Payment Terms” section. Set the number of days you expect payment. You can also add late fees. This ensures you get paid on time.
Saving And Sending Invoices
After filling in the invoice details, save it as a draft. This allows you to review it later. Click the “Save as Draft” button. This option is at the bottom of the page. Drafts let you make changes before sending. Always double-check for errors. Saving drafts helps keep your records organized. It also ensures accuracy.
Once the invoice is ready, email it to the customer. Click “Email” on the invoice page. Enter the customer’s email address. Add a message if needed. This personal touch can improve communication. Click “Send” to email the invoice. Make sure the email address is correct. This avoids delivery issues. Keeping a record of sent invoices is useful. It helps track payments and follow-ups.
Tracking Invoice Status
Open Xero and go to the Sales menu. Click on Invoices. You’ll see all your sent invoices there. Use the search bar to find a specific invoice. Sent invoices have a status next to them. This helps you know if they are paid or unpaid.
Check the status column to see if an invoice is paid, awaiting payment, or overdue. Click on an invoice to view more details. Look at the payment history to see any partial payments. Mark an invoice as paid when you receive money. This keeps your records accurate.
Credit: precoro.com
Managing Invoice Payments
Recording payments in Xero is simple. First, click on the invoice you want to update. Then, click on the “Add Payment” button. Enter the payment details like date and amount. Make sure to select the correct bank account. Finally, click “Save”. The payment will be recorded.
Overdue invoices need attention. First, check the invoice status. Send a reminder email to the client. If needed, call the client. Update the invoice with any new information. You can also set up automatic reminders in Xero. This keeps your cash flow healthy.
Tips For Efficient Invoicing
Set up recurring invoices to save time. Click on “New Invoice” and choose “Repeat.” Enter the details and select the frequency. This ensures timely billing for repeat customers. No need to create invoices each time.
Use invoice reminders to get paid on time. Enable reminders in the invoice settings. Choose when to send them. This helps remind clients of due dates. Reduces late payments. Keeps your cash flow steady.

Credit: www.youtube.com
Conclusion And Next Steps
Raising an invoice in Xero is simple and efficient. Follow the steps to ensure accurate billing and timely payments. Next, explore additional features to enhance your invoicing process.
Reviewing Invoicing Best Practices
Always double-check details before sending invoices. Ensure the client’s name and address are correct. Verify the description of services or products. Make sure the due date is clear. Include payment terms and methods. Adding a thank you note can encourage prompt payments. Keep a record of all sent invoices for future reference. Regularly review unpaid invoices. Follow up politely if payments are late. This helps maintain a good relationship with clients.
Exploring Additional Xero Features
Xero offers many features beyond invoicing. You can track expenses easily. It helps manage payroll efficiently. Use Xero to create financial reports. Monitor cash flow in real-time. Connect your bank account for seamless transactions. Automate repetitive tasks to save time. Set up reminders for important deadlines. Xero integrates with other software tools. This makes your work smoother and more organized.
Frequently Asked Questions
How Do I Create An Invoice In Xero?
To create an invoice in Xero, log in and navigate to the “Business” menu. Select “Invoices,” then click “New Invoice. ” Fill in the necessary details and save or send the invoice.
Can I Customize My Xero Invoices?
Yes, you can customize your Xero invoices. Go to “Settings,” then “Invoice Settings. ” You can add your logo, change the template, and customize fields.
How Do I Send An Invoice From Xero?
To send an invoice, first create it. Then, click “Send” at the top. You can email it directly to your customer from within Xero.
How Do I Track Unpaid Invoices In Xero?
To track unpaid invoices, go to the “Business” menu and select “Invoices. ” Use the filter options to view outstanding invoices and follow up on payments.
Conclusion
Creating invoices in Xero is simple and efficient. Start by logging in. Follow the clear steps to input all required details. Always double-check for accuracy. This helps prevent errors. Once done, save or send the invoice directly. Xero makes managing finances easier.
With practice, the process becomes second nature. Happy invoicing!

